Inhaltsverzeichnis
Creating a Test in Moodle
First, switch to the editing mode by clicking on the Turn editing on button at the top right of your course page. Only then will you be able to edit and add activities.
Click on Add an activity or resource in the desired topic area and choose the activity Quiz.
General Settings
Give your activity a descriptive Name and Description. For a quiz activity, providing detailed instructions in the description can be useful. Here, you can also include guidelines, evaluation criteria, or information about the quiz time frame. Check the box for Display description on course page if you want the description to appear on the course page.
Timing
- Time limit
If the test is to be completed within a certain time, activate this option and set the time. Otherwise, students can take as much time as they need.
- When time expires
Select from the dropdown menu what should happen if students fail to finish the test before the time runs out. If the participants are actively working on the test when the time expires, their current progress is automatically saved. If they are logged out, this setting determines what happens. The options are:- The test attempt is automatically submitted.
- Grace period: open attempts can be finished, but no further questions can be answered.
- The test must be submitted before time expires to be graded.
Grading
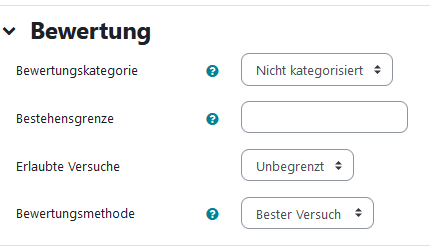 In the Grading section, set the number of allowed attempts and the grading method. If you haven't set any grading categories previously, there will be nothing to select here.
The Passing grade option determines the minimum grade required to pass.
Set the number of Allowed attempts by opening the dropdown and selecting the desired number.
If you allow multiple attempts, you can choose the Grading method from the dropdown. You can select whether the best attempt, the first, the last, or the average of all attempts should count towards the final grade.
Question Layout
 For better clarity, it may be useful to start Each question on a New page. If you have related questions or only a few, you can group them together, which will automatically insert page breaks after a certain number of questions, or display all questions on one page by adjusting the New page option. Page breaks can still be manually modified during the test setup.
For Navigation, you can choose between Free navigation and Sequential. If you want participants to proceed through the test in the order you've set, select Sequential. With Free navigation, participants can skip between questions and answer them in any order they choose.
Question Behavior
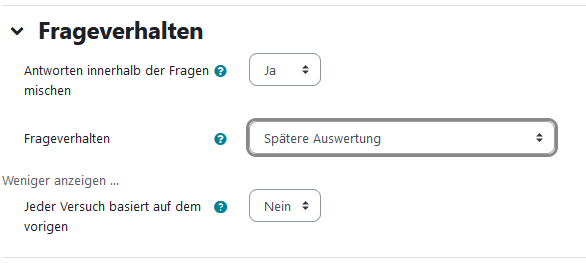 Shuffle within questions This option shuffles the answers within individual questions on each attempt, provided it is also enabled in the question settings. This makes it harder for participants to copy from each other.
This function is only effective when questions consist of multiple parts (e.g., Multiple Choice or Matching Question). For Multiple-Choice questions, answers will only be shuffled if this option is set to Yes. For Matching questions, the answer pairs are always shuffled.
- Question Behavior Alternatively, feedback can be provided immediately after each question is answered (Immediate Feedback).
If a question is answered incorrectly, participants can attempt it again, with point deductions applied for multiple attempts (Interactive with Penalties). It is also possible for participants to self-assess how confident they are in their answers.
- Each attempt builds on the last
If this option is set to Yes, the test will always display questions in the same order, allowing participants to see the answers they selected in previous attempts. If you prefer that the test questions appear in different orders, select No.
Review Options
- During the attempt controls feedback directly related to the currently answered question, typically used with 'Interactive with multiple tries'.
- Immediately after the attempt means feedback will be displayed within two minutes after the test is submitted and completed.
- Later, while the quiz is still open shows feedback as long as the test is available during the defined period.
- After the quiz is closed refers to feedback provided after the test period has ended. If no end date is set, this option is not relevant.
Select the points that should be displayed to participants during and after the test.
Display
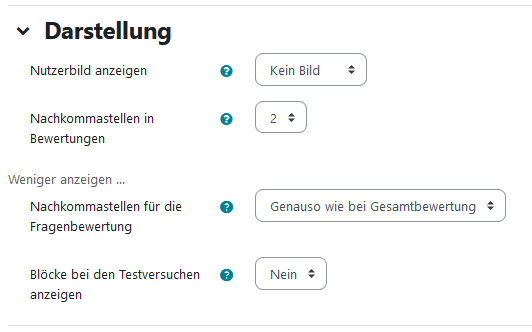 First, choose the option No image, Small image or Large image under Display user picture to show the student's name and profile picture during the test.
Set the decimal places for the grade by opening the dropdown menu under Decimal places in grades and selecting the desired number. This setting affects only the display; all decimal places are still factored into the grading.
If you expand the optional fields, you can also set the decimal places under Decimal places in question grades for individual question grading.
During the test, course blocks are hidden by default. If you want them to be available to participants, set the option Show blocks during quiz attempts to Yes.
Under Extra restrictions on attempts you can set a password. Participants will be prompted to enter this password when starting the test attempt. This feature allows you to restrict access to only selected participants (those to whom you provide the password).
Overall Feedback
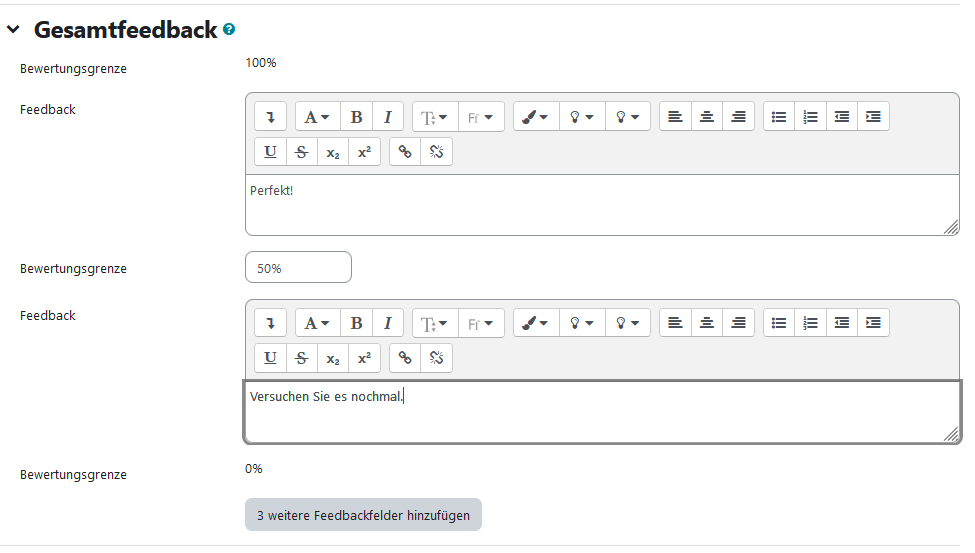 With Overall feedback, you provide students with feedback at the end of a test attempt.
You can customize the grade boundaries and the feedback können Sie (except for the 100% boundary). For example, you could suggest in the feedback field that students review the material again if their score is below a certain threshold.
The numerical values define intervals. If the test result falls between the value above and the value below the feedback text, the feedback text corresponding to that range will be displayed.
The grade boundary can be entered either as a percentage (e.g., 31.3%) or as a raw score (e.g., 7). If your test has 10 points available, a boundary value of 7 means the student needs to score 7 out of 10 points. Be aware that there must be no space between the number and the percentage sign for percentage boundaries.
If you need more feedback fields, you can add additional fields by clicking Add 3 more feedback fields .
Additional Settings
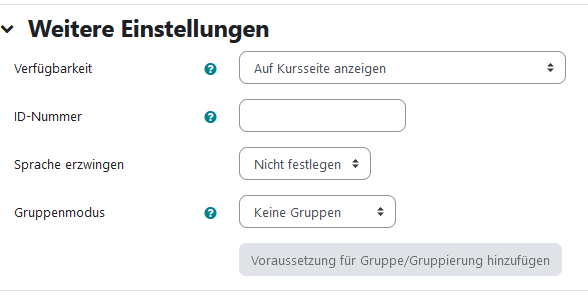 In the Additional Settings you can configure whether to display or hide the activity on the course page, just as with other activities and materials. The ID number field can be left empty.
Here, you can also force the course language to be set to English. If you are working with groups orgroupings, you can assign them here.
Prerequisites
If you want to link the activity to specific prerequisites and criteria, you can set the criteria through Additional criteria for example, by tying it to the completion of another activity or a specific date.
Completion Tracking
If you have enabled Activity Completion in your course, you can specify how the activity should be marked as completed if desired.
Finally, save your settings using the buttons Save and return to course or Save and display.
You have now created the Quiz activity. Next, you will need to add questions to fill the test with content. To do this, click on Add question.


